
GUI — Graphical interface
Launch
Section titled "Launch"./temario-grafico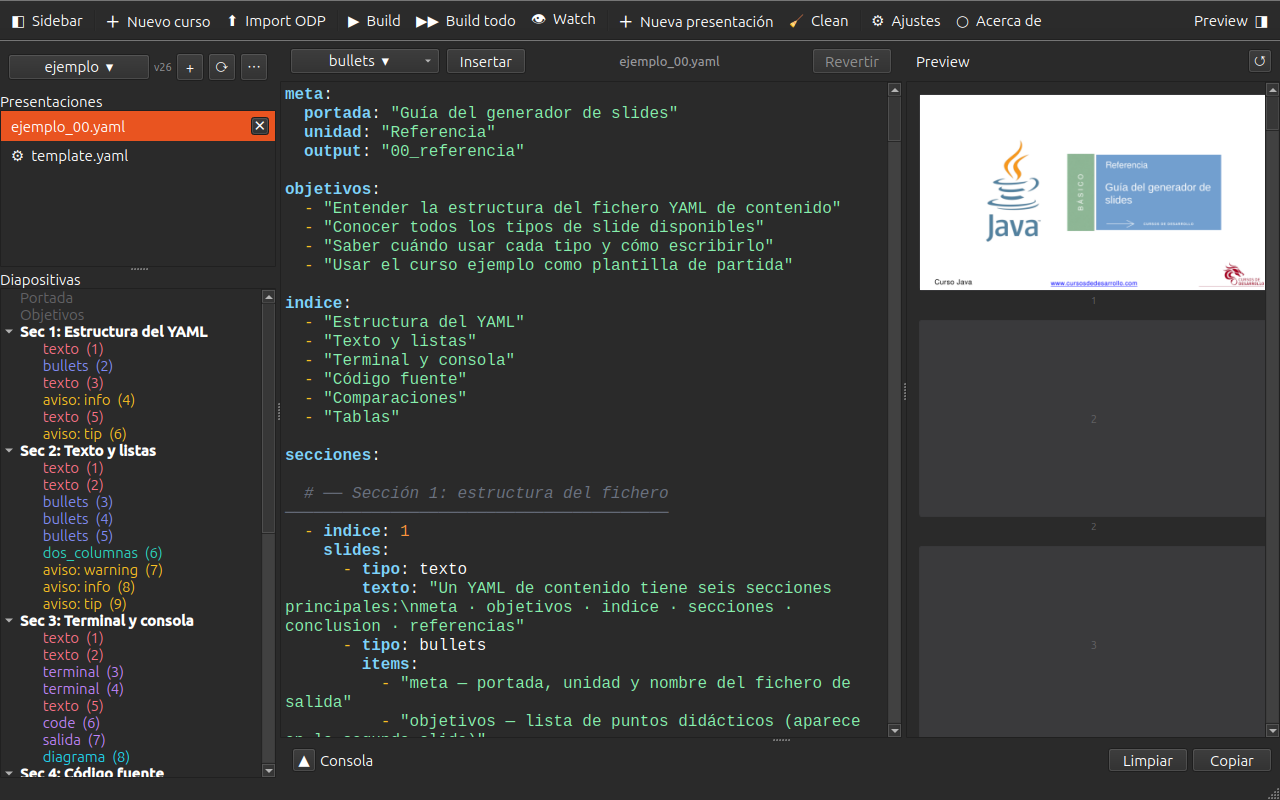
Workflow
Section titled "Workflow"1. Create a new course
Section titled "1. Create a new course"Click New course in the toolbar (or Ctrl+N). Enter the course name
and confirm. Temario creates the directory structure and copies the ODP template
from the ejemplo course. The new course is selected automatically.
2. Import your ODP template
Section titled "2. Import your ODP template"If you have your own ODP template, click Import ODP in the toolbar.
Select the .odp file and Temario will generate template.yaml with the
detected slide indices and styles. From that point on, presentations in the
course will use your template.
3. Edit the YAML
Section titled "3. Edit the YAML"The editor opens automatically with the course’s initial YAML. Edit the content — the left sidebar shows the section and slide tree in real time. Click any node in the tree to jump to that position in the editor.
Save with Ctrl+S. If auto-save is enabled, it saves automatically.
4. Build
Section titled "4. Build"Click Build (Ctrl+B) to generate the ODP and PDF. The bottom panel
shows the build log in real time.
To automatically regenerate each time you save, enable Watch (Ctrl+W).
Components
Section titled "Components"Sidebar
Section titled "Sidebar"Panel on the left with three sections:
- Course selector — dropdown menu with all available courses
- Presentations — list of YAML files in the active course
- Slides — semantic tree of the active YAML: cover, objectives, sections and slides
YAML editor
Section titled "YAML editor"Text editor with:
- YAML syntax highlighting
- Real-time validation (red underline on errors)
- Search with
Ctrl+F - Save with
Ctrl+Sand configurable auto-save
Slide Assistant
Section titled "Slide Assistant"Bar at the top of the editor with a dropdown of the 27 available slide types
(bullets, java, terminal, diagrama, tabla, etc.).
Click Insert to add the snippet at the cursor position.
Console
Section titled "Console"Bottom panel with real-time build output. After a successful build it shows the generated ODP and PDF files.
Toolbar
Section titled "Toolbar"| Action | Shortcut |
|---|---|
| Sidebar | Ctrl+\ |
| New course | Ctrl+Shift+N |
| Import ODP | — |
| Build | Ctrl+B |
| Build all | Ctrl+Shift+B |
| Watch | Ctrl+W |
| New presentation | — |
| Clean | — |
| Settings | — |
Keyboard shortcuts
Section titled "Keyboard shortcuts"| Shortcut | Action |
|---|---|
Ctrl+N | New course |
Ctrl+B | Build active presentation |
Ctrl+Shift+B | Build all courses |
Ctrl+W | Toggle Watch |
Ctrl+S | Save active YAML |
Ctrl+F | Search in editor |
Ctrl+\ | Show/hide sidebar |
Course version
Section titled "Course version"The version number of the active course is shown next to its name in the sidebar. You can edit it directly by clicking on it to force a specific number before building.
Next to the number there is a lock icon 🔓/🔒 that controls auto-increment:
- 🔓 Unlocked (default): the version increases automatically when building if an ODP with the current version already exists.
- 🔒 Locked: the version is not incremented even if the ODP already exists. Useful for regenerating with corrections without changing the version number.
The lock state is persisted on disk between sessions. From the CLI:
./temario version courses/my-course --lock # lock./temario version courses/my-course --unlock # unlockSettings
Section titled "Settings"Access ⚙ Settings in the toolbar to:
- Change the courses directory
- Choose theme (dark / light / automatic)
- Adjust the HiDPI scale factor
- Configure slide generation parameters
- Customise theme colours